- Home »
- Buena Depth Cue »
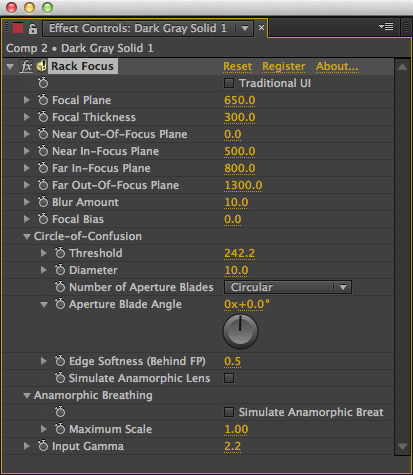
Rack Focus
The Rack Focus plugin allows you to simulate depth of field effects. When applied, layers (or parts of layers) that are near or far from the camera are blurred, while layers (or pixels) in the mid ground are in focus. This allows you to create nice focus pulls and other related effects.
Parameters ∞
Focal Plane: The distance from the camera that is in focus.
Focal Plane Thickness: The depth of the in- focus area in the composition.
Near Out-of-Focus Plane: Pixels up to this distance are blurred the maximum amount, specified in the Blur Amount parameter. Pixels between this distance and the Near In-Focus Plane distance are blurred less and less the closer you get to the near in-focus plane.
Near In-Focus Plane: Pixels closer to the camera than this distance are blurred by varying amounts. Pixels between this distance and the Far In-Focus Plane are not blurred at all.
Far In-Focus Plane: Pixels between the Near In- Focus Plane and this plane are not blurred. Pixels between this plane and the Far Out-Of-Focus Plane are blurred by an amount proportional to their distance from this plane. So pixels farther away from this plane are blurred more than those near this plane.
Far Out-of-Focus Plane: Pixels beyond this point are blurred the maximum amount.
Blur Amount: The maximum amount of blurring to apply to pixels that are either beyond the far out-of-focus plane, or are closer than the near outof-focus plane.
Focal Bias: Controls how quickly the blurring increases between the focal plane (or planes) and the out-of-focus areas. Increasing the amount causes the focus to ramp up more slowly in areas closer to the focal plane and more quickly in areas closer to the out-of-focus planes.
Circle of Confusion: In a real camera, when far away objects that are out of focus are extremely bright, such as street lights in a night scene or re- flections of the sun off of shiny objects, the camera produces artifacts where those objects end up on the film. The artifacts are usually the same shape as the aperture of the camera. This effect is often referred to as “Circle-of-Confusion” or by its Japanese name “boke” (sometimes spelled “bokeh”). The parameters in this section control whether those effects appear in your scene, and if they do, what they look like.
Threshold: Only objects with a luminance greater than this threshold will produce the effect.
Diameter: The size of the circles or polygons that are produced. If you set this value to 0, no circles or polygons are rendered.
Number of Aperture Blades: The number of blades in the aperture of the simulated camera. You can choose “Circular” to produce perfect circles, or choose a value from 3 to 9. If you’re mixing the results with scenes filmed with a real camera, you should try to match this to the same number of blades as the camera used to fi lm the other scenes.
Aperture Blade Angle: When the Number of Aperture Blades parameter is set to a numerical value, it will produce polygons for the effect. You can use this parameter to rotate the polygons that are produced.
Edge Softness: Determines how hard or soft the edges of the circles or polygons are.
Simulate Anamorphic Lens: When checked, the circles or polygons are stretched out in the same way they would be if your scene was filmed with an anamorphic lens.
Anamorphic Breathing: These parameters simulate the breathing effects of anamorphic lenses. When the focus is pulled from an object far away to a nearer object, objects in the background stretch out slightly. When the lens used to shoot the scene is anamorphic, the stretching is very pronounced in the vertical direction.
Simulate Anamorphic Breathing: Turns the anamorphic breathing effect on or off. Note that this effect is most realistic when the layers being stretched are parallel to the camera’s plane. For layers that cross both an out-of-focus plane and an in-focus plane, the results may be less realistic looking.
Maximum Scale Amount: The maximum amount of vertical scaling you want to happen to objects in the background. Objects between the in-focus planes and out-of-focus planes will be stretched proportionally to their distance from the in-focus planes. Objects beyond the out-of-focus planes will be stretched the maximum amount.
Input Gamma: This parameter only shows up in the individual layers’ list of parameters, and not in the Master Rack Focus Control layer’s list. As with the Fog plugin, this value should be the gamma that your footage has applied before applying any effects. If you’re using video in a broadcast format, such as DV, MPEG, MJPEG, etc. it should be set to 2.2. If your footage is compressed with Apple’s “Animation” codec for QuickTime, it should be set to 1.8 (even on Windows). If your footage is from a 3D application that does not apply gamma correction, it should be set to 1.0. If you’re unsure of the value, 2.2 is a safe setting to use. Setting this value correctly will make the blur look more realistic.
