Rendering Plexus
After you create your Plexus vertices, it’s time to render them. The main “Plexus” Effect at the bottom of the effect stack is what renders the scene, so make sure it’s always at the bottom.
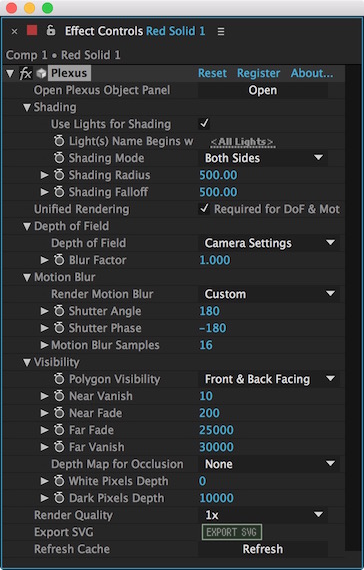
Shading ∞
You can use lights (point lights & spot lights) to shade Polygons in the scene. You can restrict the shading lights by using their names.
Unified Rendering ∞
Unified Rendering simply means all the primitives (points, lines, beams and triangles) are rendered in a common z-space. That means, even if they intersect with each other, they’re handled properly like a true 3D application. You can stack multiple Render Objects and they’re all rendered to the same 3D space instead of compositing on top of each other. Also, Unified Rendering is required for Depth of Field, Motion Blur and Seamless Beams. You need a compatible Graphics Card to utilize Unified Rendering.
Depth of Field ∞
Depth of Field can be applied to the scene and Unified Rendering has to be turned on to achieve it. The Aperture and Focus Distance are derived from the Active Camera in the composition.
Motion Blur ∞
Motion Blur can be applied in two ways. When you set the Motion Blur to Comp Settings, Plexus reads the current shutter angle and shutter phase from the active composition and creates Motion Blur using those values. When you set it to Custom you can override composition motion blur settings and apply Motion Blur according to custom shutter angle and shutter phase.
What are Shutter Angle and Shutter Phase? Plexus uses similar system like After Effects to create Motion Blur, which is controlled by shutter settings. From Chris & Trish Meyer’s excellent Creating Motion Graphics -
Shutter Angle is the amount of blur, with 360 degrees being a full frame of continuous blur. 180 degrees emulates a standard film camera. To emulate a video or still image camera, take the shutter time (such as 0.002 for 1/500 of a second), divide it by the duration of a frame (such as 0.033 for 29.97 fps), and multiply by 360 (in our example here, the result would be 21.58 degrees).
Shutter Phase decides how much the blur leads or lags the point in time described by the current frame. To center the blur on the current time, set Shutter Phase to minus one-half the Shutter Angle. (Older versions of After Effects set it to 0 degrees, which meant the blur always lagged the action.)
Motion Blur Samples (Samples Per Frame) controls how many intermediate samples are used to fake continuous blur for 3D layers, Shape Layers, and some effects that support blur. We tend to max this out, unless rendering gets really slow – in that case, back it down until just before you see visible echoes on fast-moving layers.
Please Note: Adaptive Sample Rate/Sample Rate settings of the composition is not observed in Plexus. Even if you’re using Comp Settings to control Motion Blur, you still have to set the Motion Blur Sampling Rate manually. The higher the sampling rate is, the slower the render will be. Usually, 16-32 samples per frame yields good results.
Watch the tutorial on Motion Blur to see it in action.
Visibility ∞
You can control the visibility of all the points/lines and triangles through these parameters.
Polygon Visibility: Selectively hide front facing or back facing triangles using this setting. This only affects triangles, not points or lines.
Near Fade: The closest distance from the Camera, from which points, lines and triangles start to fade to prevent flashes or huge primitives close to the camera.
Near Vanish: The distance from the camera primitives completely vanish and are not rendered.
Far Fade: The furthest distance from the camera after which the primitives are gradually faded.
Far Vanish: The furthest distance from the camera after which the primitives vanish completely and are no longer rendered.
Depth Map Occlusion ∞
If you have a depth map rendered out of a 3D application or a depth map created using Buena Depth Cue, you can selectively occlude pixels using that depth map.
After you select the Depth Map layer, you need to choose the depth of ‘White Pixels’ and ‘Dark Pixels’. Some programs export depth maps that get darker as you get closer to the camera, while some export depth maps that get lighter. So choose your depth values accordingly.
Watch the tutorial on Depth Map Culling to see it in action.
Render Quality ∞
This sets the Render Quality for the current frame. It doesn’t affect Motion Blur Samples. But, it affects Depth of Field and Opacity. If you have a lot of transparent primitives overlapping or have high aperture Depth of Field, you can improve the quality by adjusting this parameter. Remember, higher the quality, slower it is to render.
Export SVG ∞
You can export SVG files directly from Plexus. Look at this section for more information.
Collapse Transforms ∞
If you have multiple Plexus layers in a composition and want to render them all in the same 3D space with common visibility settings and polygon shading, you can nest that composition into a parent comp, apply Plexus on the nested comp and collapse it’s transformations. Now, the Plexus layers in the nested comp will react to the Camera and Shading Lights in the parent composition.
To understand it better, watch this quick tutorial on Collapse Transforms.
